
I recently discovered a feature in MailChimp that allows you track from where a subscriber joins your list: hidden fields.
Why would you want to do this?
- Test which pages have effective sign up pages and which do not
- Evaluate which offer attracts more subscribers
- Discover what your subscribers are looking for based on how they sign up
- Send targeted content e-mails based on your subscribers interests
I first learned about hidden fields from Bryan Harris at VideoFruit but I mistakenly thought you needed LeadPages or a paying account at MailChimp. Nope! You can do it without LeadPages and with the free MailChimp account. Now, Bryan is using this in a slightly different manner: readers must opt-in for every content upgrade they want. This allows Brian to track everything his subscribers are interested in. I believe he uses LeadPages to do this. With just MailChimp, each reader can only subscribe once to your list (per e-mail address). Even with this limitation, you’ll find tracking this information useful.
Let’s get started! You will need to edit the code to do this, but I’ll walk you through it and give you most of it to copy and paste.
Creating the Signup Source Field
MailChimp allows you to add additional fields to your sign up forms and these fields can be hidden from the reader. This allows you to control the information that is stored, not the reader who is subscribing to your list.
The first thing you need to do is create the hidden field.
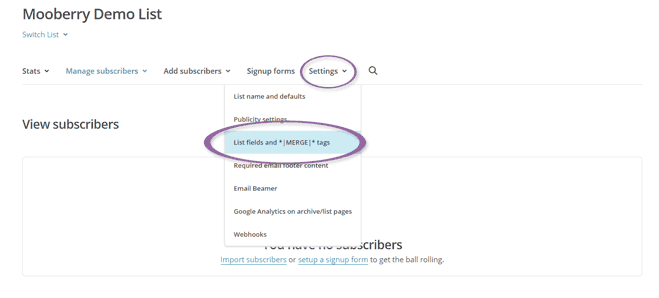
- Log in to MailChimp and choose the list you want to work with. Under Settings click on List fields and *|MERGE|* tags.
- Click on Add a Field and then text.
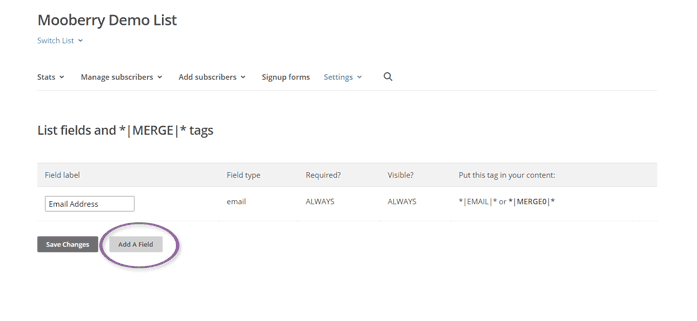
- Now fill in some settings and click Save Changes.
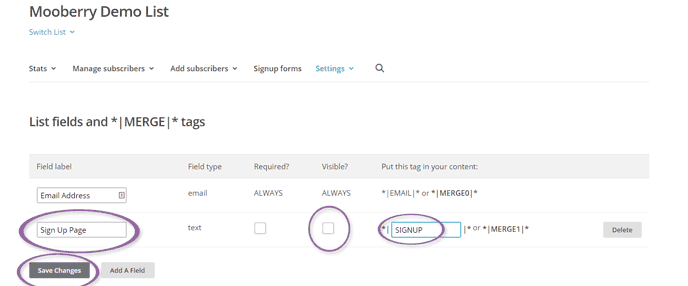
- Field Label: Because this will be a hidden field, the reader will never see it so you could set it to whatever you want. Set it to something useful for yourself to remember what this information is.
- Visible?: Uncheck this box so it is empty, not blue. This makes the field hidden.
- Field Tag: This needs to be something unique for this list. Remember what you enter here because you’ll need it later. In my example, I am using SIGNUP. MailChimp will force it to be all in capitals, won’t let you put in a space, and won’t let you go past 10 characters.
Our hidden field is created. Now we have to add it to our sign up form and set it to a value. I’m assuming you’ve already added sign up forms in mutliple places on your website. If not, you’ll need to go to Signup Forms, click on Embedded Forms, customize your form, and then copy and paste the HTML code into your website.
Filling the Sign Up Source Field
This is the part where you’ll have to edit some code. If that makes you nervous, just take a deep breath, relax, and follow the instructions closely.
This is the line of code you will copy and paste into your page. I’ll show you exactly where to put it, and exactly how to edit it for your site.
<input type="hidden" name="SIGNUP" id="SIGNUP" value="widget" />
For the purposes of this tutorial, I’m going to assume you have three sign up locations:
- A sidebar widget
- On a launch page
- On a subscribe page
On a piece of paper or a temporary text file on your computer, list all the places you have a sign up form. This is just a reference for you.
For each one, write down a word or two that corresponds to each location. In this example, I might use “widget”, “launch”, and “subscribe”. It doesn’t matter what you use, as long as it makes sense to you.
For each sign up location, follow these steps:
- Copy the above line of code.
- Find where you’ve pasted in MailChimp’s code and edit it.
(Because this is specific to your site, I can’t give exact details on this step. But for example, if you are using WordPress and the sign up form is on your sidebar, you’d go into your WordPress Dashboard, click on Appearance, click on Widgets, and open up the one that corresponds to your sign up form.) - Near the bottom of the code, you’re going to look for a line that says this:
<div class=“clear”><input type=“submit” value=“Subscribe” name=“subscribe” id=“mc-embedded-subscribe” class=“button”></div>
- Put your cusor between the after class=“button”> and before </div>

- Paste in the line of code you copied above.
- Change the text that says SIGNUP to the Field Tag you used before. Make sure your keep the quotes around this text. You need to do this in both places in the line of code.
- Change the text that says widget to whatever word you wrote down. In my example, that would “widget”, “launch”, or “subscribe” depending which form I’m editing. Make sure your keep the quotes around this text.
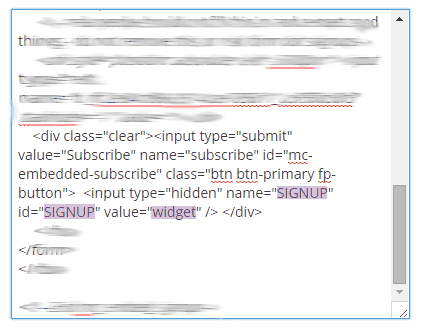
- Double check your code. It should look exactly like the code you copied except the words SIGNUP and widget should be replaced with your specific words. Check that all the quotation marks and other symbols are where they should be.
- Save your changes.
- Repeat this for your other sign up forms. The Field Tag text will be the same for all of them. The only thing that will change is the word you put in for value.
Test the Changes
It would be a good idea to test all the forms you just edited. You don’t want to miss out on subscribers because you have an error in your code.
Because you can only be subscribed once to a list with MailChimp, you’ll need to either use multiple email address, or unsubscribe before trying the next form.
So go through each form and subscribe yourself and make sure the whole process works.
Using the Sign up Source Field
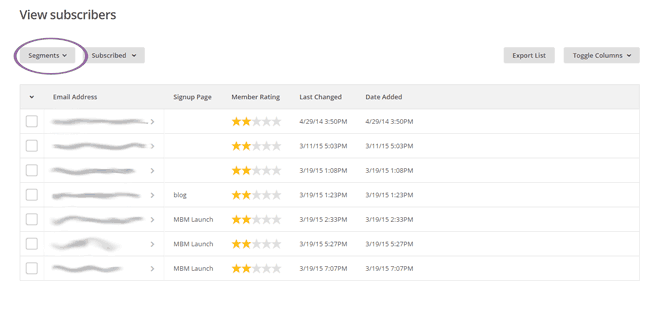
Now that you’ve added the Sign Up Source field, you’ll be able to see from what page readers are subscribing. View your list of subscribers:![]()
The header of the column corresponds to the Field Label you used when you created the hidden field. The value for each subscriber corresponds to the word you chose for each location (for example, “widget”, “launch”, “subscribe”.)
Anyone who signed up before you made this change won’t have any information in this column. But you should see your e-mail address from your testing, and it should have the value for the last form you tested.
Now you can create segments on your list based on where your subscribers signed up from.
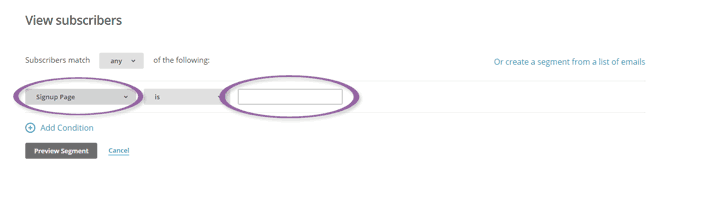
- From your list of subscribers, click on Segments and New Segment.
- Choose your hidden field from the drop down list. Enter the value you want to create the segment for. (For example, “widget”, “launch”, or “subscribe”.) Click Preview Segment.
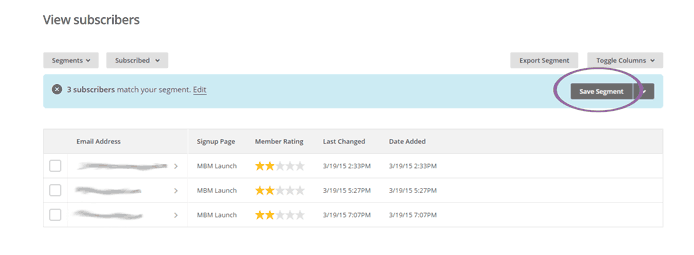
- MailChimp will show you which of your subscribers match. (There might not be any yet.) Click Save Segment.
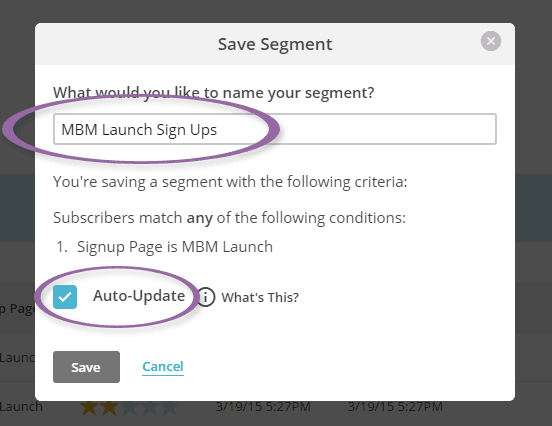
- Name your segment so that it makes sense to you. Make sure Auto-Update is selected.
- Click on Send to Segment to send a mail campaign to just these subscribers.

You can create a segment for each of the different values you set up for your hidden fields.
What Else Can We Do With Hidden Fields?
As you can see, adding a hidden field to your MailChimp sign up form is easy. You can use that information to better serve your readers by targeting them the email you send them based on where they originally signed up.
You can add a hidden field to track anything you want. You can also add multiple hidden fields per form, just follow the same steps above.
Other things you could track:
- If you give away free content when a reader subscribes and later change what that content is
- If you use different types of sign up forms, such as pop ups vs. embedded
- If you have a separate sign up for readers visiting from a mobile device